2012年12月28日 星期五
2012年12月27日 星期四
2012年12月25日 星期二
2012年12月24日 星期一
2012年12月23日 星期日
we are friends
we are friends:
pontinhos meus has added a photo to the pool:

pontinhosmeus.blogspot.pt/2012/12/we-are-friends.html
pontinhos meus has added a photo to the pool:
pontinhosmeus.blogspot.pt/2012/12/we-are-friends.html
little wild Sugar Gilder Ring .
little wild Sugar Gilder Ring .:
CaramellyBurn has added a photo to the pool:

www.etsy.com/listing/117960954/little-wild-sugar-glider-h...
CaramellyBurn has added a photo to the pool:
www.etsy.com/listing/117960954/little-wild-sugar-glider-h...
Aretes de cuentas de papel
Aretes de cuentas de papel:
María Tenorio has added a photo to the pool:

Hechos con cuentas de papel de revista y piezas de piúter
gineceoblog.wordpress.com
María Tenorio has added a photo to the pool:
Hechos con cuentas de papel de revista y piezas de piúter
gineceoblog.wordpress.com
PLATYPUS BAG
PLATYPUS BAG:
"RED ELK" has added a photo to the pool:

PLATYPUS BAG
A great bag for carrying your sport shoos, school books or anything you need for a day at the beach. Just the right size for your laptop too!
Measures: 35cm wide by 48cm tall, with straps=2 cm.
A 100% cotton outside back pack/cinch sack and black cordura inside.
There is one large main compartment and a inner pocket with a magnet.
"RED ELK" has added a photo to the pool:
PLATYPUS BAG
A great bag for carrying your sport shoos, school books or anything you need for a day at the beach. Just the right size for your laptop too!
Measures: 35cm wide by 48cm tall, with straps=2 cm.
A 100% cotton outside back pack/cinch sack and black cordura inside.
There is one large main compartment and a inner pocket with a magnet.
Matryoshka
Matryoshka:
{JooJoo} has added a photo to the pool:

The second little girl is here! She is made of green polymer clay and I've painted the scarf, face and apron with acrylic colors. She is very playful and fun to be with!
{JooJoo} has added a photo to the pool:
The second little girl is here! She is made of green polymer clay and I've painted the scarf, face and apron with acrylic colors. She is very playful and fun to be with!
緊湊型食品雜貨手提包{模式}!
緊湊型食品雜貨手提包{模式}!:

這是被稱為緊湊型食品雜貨手提包的項目之一。這是一個可逆的包,每一個細節都經過深思熟慮。我喜歡額外的拼接上的手柄,使他們更加堅固。


我有所有你今天這麼一大樂事!
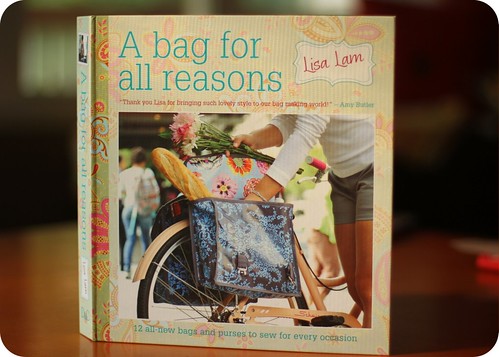
這是麗莎林的新書,名為袋裝對於所有的原因。這是一本書,充滿了12個新的設計和不同的技術,不同的方式添加拉鍊,口袋和肩帶使每個包你自己的一大段。我真的很喜歡,幫助它平放,而你的工作模式通過螺旋裝訂。的模式都是全尺寸和位於後面的幾個大張的紙書。這是很好的放大圖案片!
這是麗莎林的新書,名為袋裝對於所有的原因。這是一本書,充滿了12個新的設計和不同的技術,不同的方式添加拉鍊,口袋和肩帶使每個包你自己的一大段。我真的很喜歡,幫助它平放,而你的工作模式通過螺旋裝訂。的模式都是全尺寸和位於後面的幾個大張的紙書。這是很好的放大圖案片!
這是被稱為緊湊型食品雜貨手提包的項目之一。這是一個可逆的包,每一個細節都經過深思熟慮。我喜歡額外的拼接上的手柄,使他們更加堅固。
我做了這個出的Loulouthi面料安娜·瑪麗亞·霍納和我有計劃做一些更。這將是一個偉大的聖誕襪!他們捲起不錯,緊湊的錶帶。
最好的事情是,我可以給你訪問的模式和方向{免費}!
你會找到一個PDF的項目和一個模板打印出在這裡 。
麗莎解釋每一個步驟,並做了偉大的工作,現在你可以看到自己,她的模式是如何工作的!我想你一定會喜歡自己的一包,我很高興能夠和大家一起分享這種模式!
本週末我完成了幼兒背包...它很可愛,但我不得不採取一些它的照片。
這裡是一對夫婦,你可能會感興趣的其他鏈接:
33%折扣的袋子,對於所有的原因和對麗莎林產品在瑪莎·普倫店優惠券代碼:“BAGS2012”。
一個袋子的原因: http://store.marthapullen.com/ 袋的原因
製袋聖經: http://store.marthapullen.com/ 製袋聖經z7338
數碼預覽的原因:一個袋子 http://www.scribd.com/doc/ 86496482/A-Bag-for-All- 的原因,讓美妙的結構, 袋為每個場合
我希望你有機會去嘗試的緊湊型食品雜貨手提包很快!
〜傑西卡
The Beadful Life @ beadFX: EMERALD! Pantone Colour of the Year 2013
The Beadful Life @ beadFX: EMERALD! Pantone Colour of the Year 2013: "Lively. Radiant. Lush… A color of elegance and beauty 
“活潑。輻射。鬱鬱蔥蔥的優雅和美麗的顏色
,增強了我們的幸福,平衡與和諧感。“
“ 綠色是自然界最豐富的色調-人眼所看到更多的綠色比其他任何顏色的頻譜“Leatrice艾斯曼,彩通色彩研究所的執行董事,在一個新聞發布會上說。“這也是生長,更新和繁榮的顏色-沒有其他的顏色傳達再生多綠色。幾個世紀以來,許多國家都選擇了綠色,代表癒合和團結。“, 該公司翡翠“生動,翠綠的”和“促平衡與和諧,”根據釋放。相比之下,2012年的“意氣風發”色調蜜橘探戈 “提 供的能量提升,我們需要充電,向前邁進。”
 ...
...
“活潑。輻射。鬱鬱蔥蔥的優雅和美麗的顏色
,增強了我們的幸福,平衡與和諧感。“
“ 綠色是自然界最豐富的色調-人眼所看到更多的綠色比其他任何顏色的頻譜“Leatrice艾斯曼,彩通色彩研究所的執行董事,在一個新聞發布會上說。“這也是生長,更新和繁榮的顏色-沒有其他的顏色傳達再生多綠色。幾個世紀以來,許多國家都選擇了綠色,代表癒合和團結。“, 該公司翡翠“生動,翠綠的”和“促平衡與和諧,”根據釋放。相比之下,2012年的“意氣風發”色調蜜橘探戈 “提 供的能量提升,我們需要充電,向前邁進。”
 ...
...
The Beadful Life @ beadFX: A kid initiated beading weekend
The Beadful Life @ beadFX: A kid initiated beading weekend: I can't even begin to tell you how excited I am! I've been gently encouraging my girls, especially the eldest, to work on art projects, vari...


我想我會玩得開心這樣的事情:

我想我會玩得開心這樣的事情:
Anthropologie Cirrus Duvet Tutorial
Anthropologie Cirrus Duvet Tutorial:


After my beloved duvet died, I looked and looked for a replacement. I settled on this Cirrus set from Anthropologie. I love white bedding. I can’t explain it. But no prints for me, just white.
Then I decided to just take a few hours and make it myself. It’s very easy, just time consuming. Here’s how.
First, determine your duvet size.
Twin
68 x 88 inches
Full Queen
88 x 88 inches
King
104 x 88 inches
Next buy 3 coordinating flat sheets. For example, if you’re making a king, buy three king in whatever color. These were $15 each from Target.
Next takes a little math. Figure out how many gathered strips you want. I decided on 9. You could do just three large ones, smaller ones- whatever you prefer. Then after that decide how many straight strips you need. I needed 8 strips for my 9 gathered rows. Then figure out the width to cut each row. After that, cut your strips out of the sheet. You’re gonna end up with a whole lotta this:
Since my duvet needs to be 88 inches wide, I knew I needed double that to make the gathers. So I cut two strips that were 10 inches by 88 inches, then sewed the two together to get one long strip making it 10 x 176.
The first step is to gather, or ruffle your first long piece of fabric. Do it on one side first. Then pin that ruffeld side to one of your straight strips of fabric.
Serge it together. The ungathered top will be sewn to the back of the duvet so don’t do anything about it now. Just get another long strip, gather one end and attach it to the other side of the straight strip.
Then gather the other end and attach antoher straight strip. And that’s your pattern to the bottom! When the front is all completed, gather the top of the duvet then attach it to one of the sheets. Serge all the way around the sides and top. Leave the bottom open and hem it. You can add buttons or whatever kind of closure you like. Then here’s how it looks on.
I love the effortless look of it. It almsot looks like a messy white sheet laying on the bed.
I love different shades of white so I’m going to keep the cream accent pillows and make some brighter white euro shams. I didn’t want to do the same technique because it’s a little too matchy for me.
Total time was about 5 hours. I was about to pull my hair out by the end of it because it’s so repetitive, but it was totally worth $45!! Hope you find this useful!

Bold Leather Flower Belt Tutorial
Bold Leather Flower Belt Tutorial:
 marc jacobs
 although this is a cuff, it was one of my inspirations
 asos
asos


marc jacobsalthough this is a cuff, it was one of my inspirationsasosSo when I decided to do a belt as a tutorial, I posted it on FB and a reader suggested using recycled leather and I thought it was genius! So in my weekly trip to the thrift store I found this deep eggplant leather skirt.
My first step was taking the skirt apart. You can do it with scissors or a seam ripper. Then make a template of the belt shape you want to cut out. I made mine as shown out of pattern paper. You can use regular paper, cloth, whatever you have.
Next, lie it out on your leather and trace it.
Cut it out. If you don’t have a sewing machine you can just stop here. This belt will look great even as one piece.
But if you want to do an extra step, you can cut out another piece.
Sew it together, inside out leaving a hold to pull it through. I don’t know if all machines will sew through leather well. Mine does it just fine. Definitely use a leather needle to make it easier.
After pulling the belt right side out, top stitch all the way around.
Now that the base of your belt is made we’ll work on the flower. Cut out a bunch of different petal shapes.
Begin piecing them together, a couple at a time. You can machine stitch them together, like I did. But if you don’ have a machine you can sew it by hand. Or if that intimidates you, there’s always glue 
Just add more until you’re happy with the piece.
Then attach it to your belt.
Now, to cover where you stitched it on, get one more petal and sew it as shown.

Then you can flip it over and no stitched show.
For the closure, I added a heavy duty snap that I sewed on.
Here’s the finished result!
I love the way it looks on this simple maxi dress.
Tons of detail and drama. And SO easy!!
Thrift Store Finds
Thrift Store Finds:


I loved this sweater coat that I found at the thrift store last week. It immediately reminded me of the amazing Celine and all her leather on minimalist pieces.

Although I’ll have to wait for fall to wear it, I can’t wait. It’s 100% wool with the leather down the front. How great does it look belted?
Now I’m just trying deicde whether to take it or leave it loose and flowy in the back.
Your thoughts?
訂閱:
文章 (Atom)