2012年10月19日 星期五

YOUDISCOLL: ADELE - Live At The Tabernacle 2011
YOUDISCOLL: ADELE - Live At The Tabernacle 2011: ADELE - Live At The Tabernacle 2011 DVD Cover

ADELE - Live At The Tabernacle 2011
DVD Cover
DVD Cover

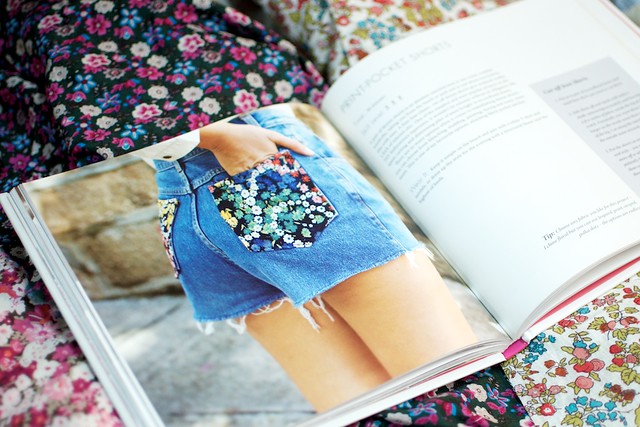
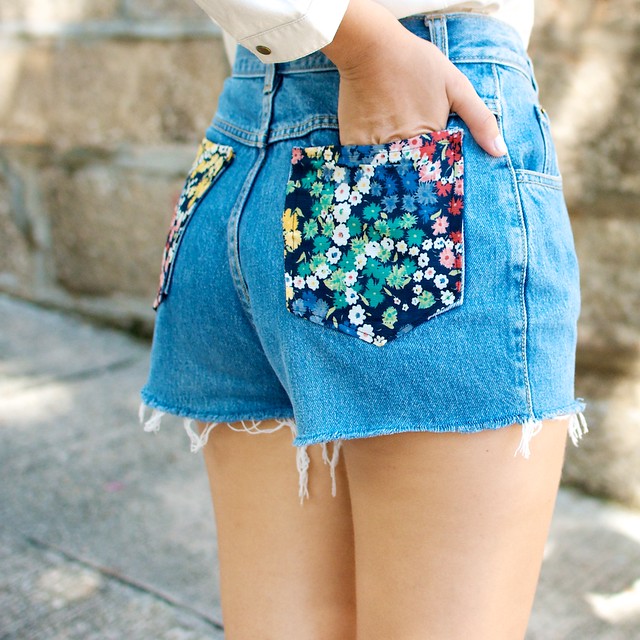
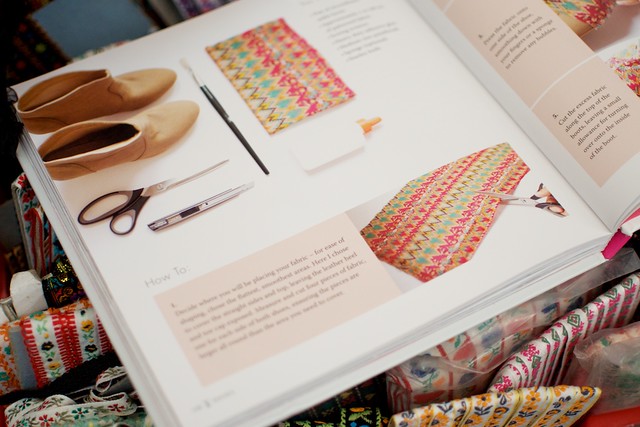
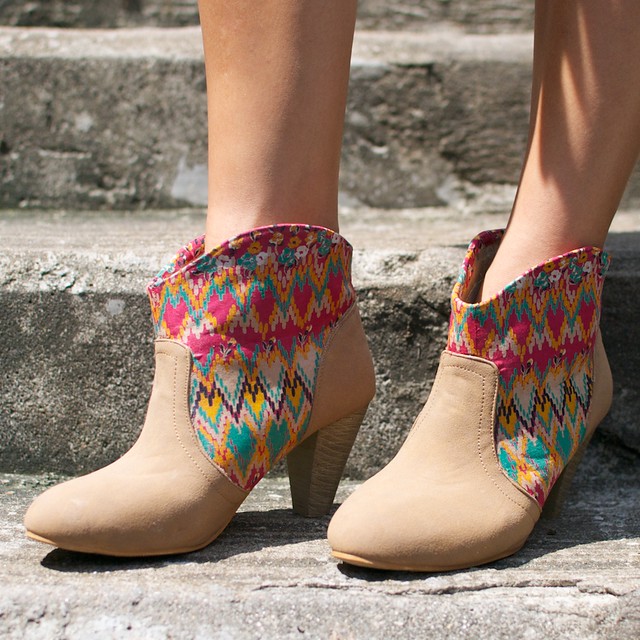
a pair and a spare . diy fashion: DIY INSPIRATION: EMBELLISHED JACKETS
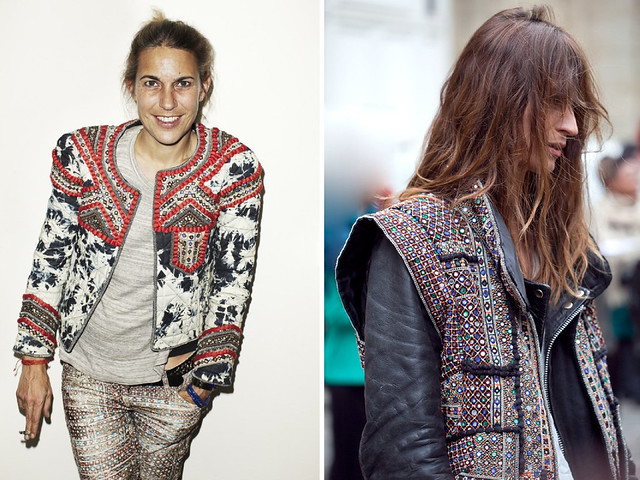
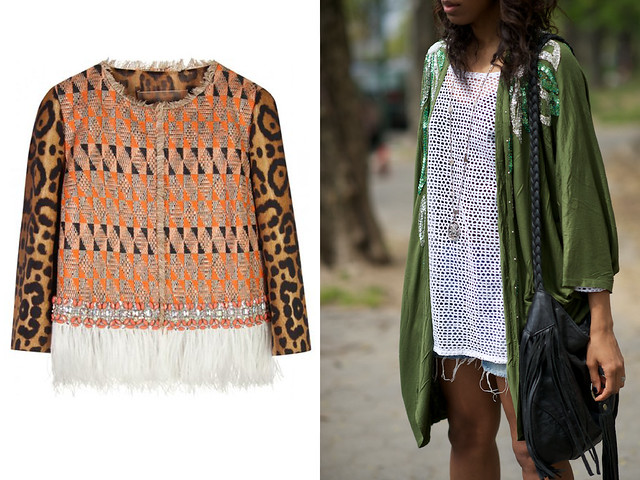
a pair and a spare . diy fashion: DIY INSPIRATION: EMBELLISHED JACKETS: Not that I want to catapult myself too quickly into next season, but I've recently been eyeing off all sorts of embellished jackets. They a...


DIY靈感:點綴夾克
不,我想自己也迅速進入下個賽季彈射,但我最近一直在虎視眈眈各種點綴的夾克。他們一定會成為一個很大的靈感,我的DIY項目在未來幾個月內。我想巴爾曼,伊莎貝爾Marant和Sass&彼得風格的作品!

a pair and a spare . diy fashion: BIG NEWS: MY FIRST BOOK 'DIY FASHIONISTA' HAS JUST...
a pair and a spare . diy fashion: BIG NEWS: MY FIRST BOOK 'DIY FASHIONISTA' HAS JUST...: I'm so incredibly happy to finally share with you the news that my first DIY book, DIY Fashionista launches today! It's been terribly ...
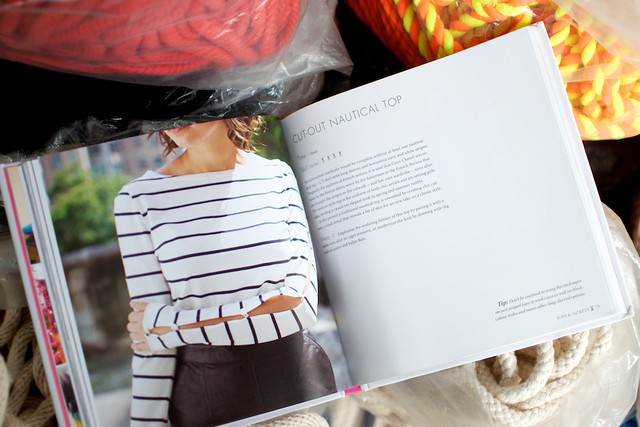
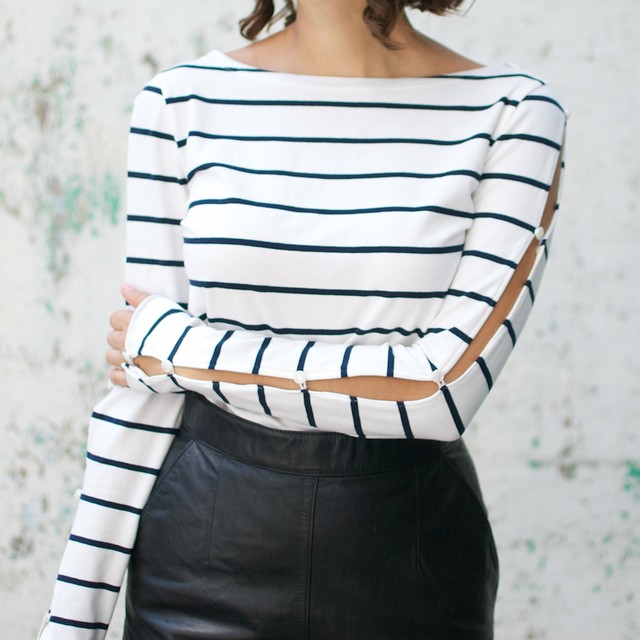
在一個更加個人的注意,我要感謝你從我的心臟底部回來一次又一次到我的博客在過去的3年。沒有你們的不斷支持和建議,本網站(現在書)就不存在了。在過去的12個月內,到這本書,我把我的那份DIY的心臟和靈魂,我必須說,這是真正令人驚訝地看到我的工作,並在打印的話(精裝不能少!)。我覺得自己很幸運的一部分,這樣的創意和支持社區的DIY愛好者,謝謝你這麼多-這本書獻給你們! 敬請期待在未來幾個月內的一堆有趣的贈品,發射方的詳細信息和其他活動,當然許多許多的DIY項目!
a pair and a spare . diy fashion: DIY CAVIAR INSPIRED CAP TOE HEELS
a pair and a spare . diy fashion: DIY CAVIAR INSPIRED CAP TOE HEELS: In recognition Breast Cancer Awareness month, I recently customised a pair of classic Nine West black pumps as part of the Fashion Target..
2012年10月17日 星期三
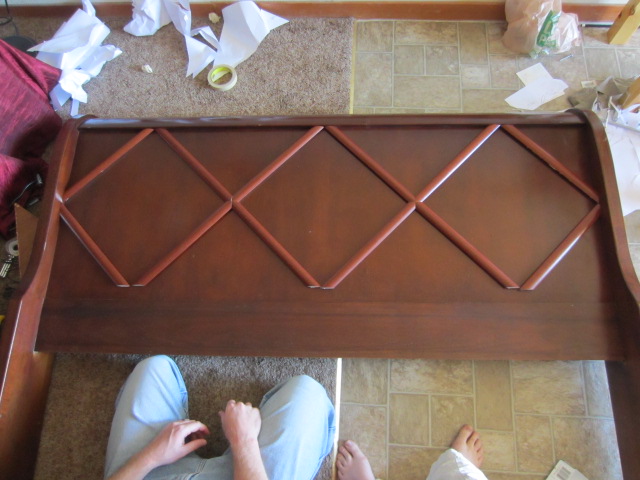
How Do U Like Them Apples?: Third Thursdays with Tash: Trash to Headboard
How Do U Like Them Apples?: Third Thursdays with Tash: Trash to Headboard: Hey Readers-Tash here! Have you ever dumpster dived? I really don’t normally, but our apartment complex seems to collect interesting trash...


The headboard hung around, taking up space in the cramped hallway that is the laundry room, until we could gather all of the supplies to upholster it. You have no idea how weird the discussion was on upholstering. I thought, “A big piece of plywood, foam, fabric, and buttons. Attach it to the headboard and you’re done!” Spencer thought, “Buttons look like a giant pillow.” Apparently a framed giant buttoned pillow is not what you sleep under. It will cause nightmares or something!

The discussion on fabric was weird too. I never thought I would be trying to talk my husband out of a color he doesn’t like. Initially I walked past the fabric we chose. Even though it perfectly matched the style we wanted, it looked too pink to me. Spencer insisted it’s not pink, it’s warm with gold undertones. Well when he put it so eloquently how could I resist?
 |
| See I helped! There are my toes :) |
Once we obtained all of our materials it took us all of Labor Day weekend to put the pieces together. By us I mean Spencer, with a little help from me when he needed four hands. We put it together faster than I could take pictures too. One moment it was a mock up, then a lattice, then done!
 |
| My husband is so good at drilling, he only needs one hand :) |
Here’s the cost break down:
Headboard- Free!
Plywood- leftovers from other projects, Free!
Foam- $20, but we only used half
Fabric- $8
Hardware- approx. $200.
Total- $228

2012年10月16日 星期二
Sew Much Ado: We Did It! Wednesday
Sew Much Ado: We Did It! Wednesday: Welcome to We Did It! Wednesday! Here's how We Did It! Wednesday works: 1. Enter a link (specific blog post, not your homepage) using ...
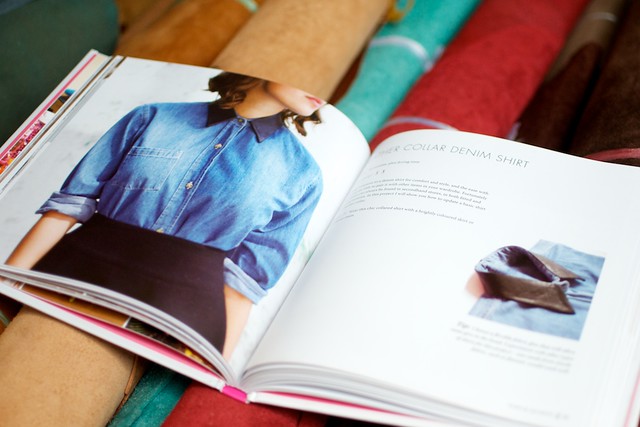
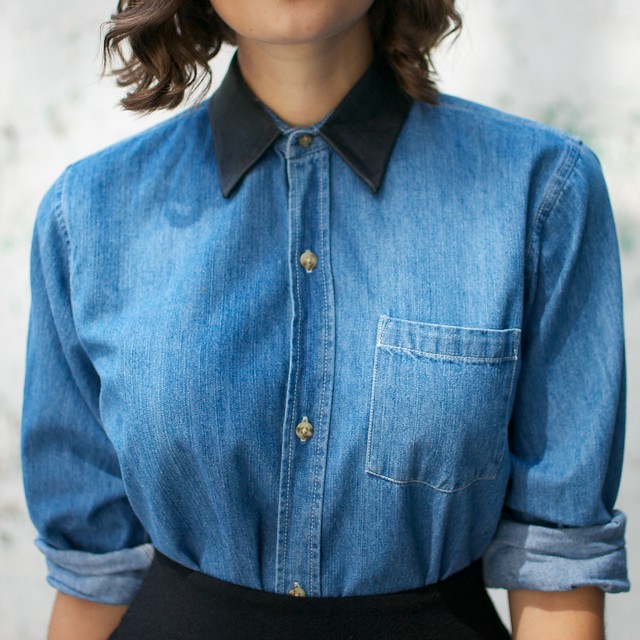
Sew Much Ado: How to add a Peter Pan Collar to Any Top
MONDAY, OCTOBER 15, 2012
How to add a Peter Pan Collar to Any Top


Peter Pan collars are everywhere right now...
From J.Crew...


To Anthropologie...

You'll find them on t-shirts, sweaters, and dresses. The bad news? Tops like the ones above can be priced up to $98, which, as cute as they are, I'm not willing to spend on a shirt. The good news? You don't have to spend $98! Most of us already have one (or three) sweaters or dresses in our closet that can easily be transformed, and today I'm going to show you how!

Ready to take this...

To this?

Let's get started...
Materials:
round necked top (or dress) - remember that if you're using a sweater with a small neck opening that relies on stretch to get over your head, that adding a non-stretchy collar might make it difficult to get the sweater on - make sure you'll still be abe to wear the sweater after the collar is added :)
cotton scraps large enough to cut 4 front/back collar pieces
mid-to-heavy-weight fusible interfacing (I used Pellon 930F)
Instructions:
1. Fold your top in half as pictured. Try to keep the natural shape of the curve in place.

2. To make your collar pattern, trace the curve between center front to center back.

3. Sketch your collar shape on each end of the curve as desired - I made the front collar a bit larger than the back.

4. Trace around the entire collar, 1/2" away on all sides (to account for seam allowance).

5. Cut your pattern out and use it to cut 4 collar pieces out of your fabric, plus 4 pieces out of interfacing (I had to adjust my curved seam allowance to 1/4" to fit the pattern piece on my fabric).


6. Fuse interfacing to each collar piece.

7. Right sides together, stitch two collar pieces together along outer curve (inner curve will remain open). Trim seam allowance to 1/8". Repeat with remaining two collar pieces.

8. Turn collar right side out and press flat. Topstitch along outer curve 1/4" away from edge. Repeat with other collar piece.


9. Serge the inner curve, removing NO fabric with the serger blade, or zig-zag stitch along inner curve. Repeat with other collar piece.

10. Mark center front and center back of top with pins and pin collar to wrong side as pictured (the more pins the merrier, especially if sewing with one stretchy and one non-stretchy fabric. The collar should overlap the neck edge 1/2".


11. Stitch along pinned edge, attaching collar to top. Repeat steps 10-11 with other collar piece.


12. Fold collars over and press flat in place against top.

13. Topstitch around entire neckline and collars, 1/4" from folded edge of collar.


You are done!


Enjoy your new Peter Pan top!


訂閱:
文章 (Atom)